Thursday, May 2, 2013

Computing Guide To Being Paranoid

They’re watching you. Literally. In a recent article posted at Ars Technia, it was reported that hackers have the ability to remotely take over your computer and install software on your computer that allows them to turn on your webcam. What? They do this using a RAT pack (Remote Administration Tool). In addition to that, we are hearing of new router exploits that give a hacker the ability to remotely access your router and gain access to your Local Area Network. If you think you’re overly paranoid about your computing you should be. This stuff is scary.
So now that you know that the whole world is out to get you, what can you do about it? These steps will help close some of the holes used to exploit computers.
Turn off Remote Administration – Remote administration in routers give users outside of your network the ability to access and control your router. In many cases, this is turned on by default. What? Of course the intention of this option is benign, but it can be used by a hacker to get into your LAN and see all of your internal computers, manipulate your firewall and do basically anything they want with your traffic.
To do this, you can navigate to your router’s admin page using your web browser. Normally, this can be done by typing http://192.168.1.1 or http://192.168.0.1 into your browser’s address bar (not the search bar). Your router location may vary. You will also need to know the username and password of your router. If you do not know it, and the router was supplied by your ISP, you can check the physical device to see if the information is printed there or call your ISP for log in details.
Look for an “Advanced” or “Administrator” tab and make sure remote administration is disabled.
Turn Off Wake On LAN - While not necessarily an exploit, WoL allows your computer to be turned on when powered off from an outside source. Imagine this, ole paranoid one, if a hacker had access to your internal LAN and had the ability to turn on your PC whenever he or she wanted to perform whatever nefarious acts he or she wanted. Unless you have a specific need to have it on, go into your computer BIOS when booting and disable that wicked feature. Depending on your BIOS, it may not even be an option.
Turn Off Allow Network Traffic To Wake Computer – Similar to WoL, your network adapter has the ability to listen to network traffic and can allow your computer to be woken up while asleep.


To shut this down, go into the Control Panel, look for your network adapter, right-click it and select Properties. Under the Power Management tab, uncheck that option if it is checked.
Turn Off UPnP – Turn off Universal Plug and Play in your router. Universal Plug and Play allows programs within your network to automatically punch holes in your router. What? Us paranoids can’t allow this to happen! Imagin a virus on your network having free reign to open ports on your router to allow even more bad guys in. For most of us, having this feature off will not affect anything we do from day to day. For others, you may need to occasionally go into your router and manually open ports for programs or system that require them to be open–like game consoles, for instance. You can turn off UPnP in your router.
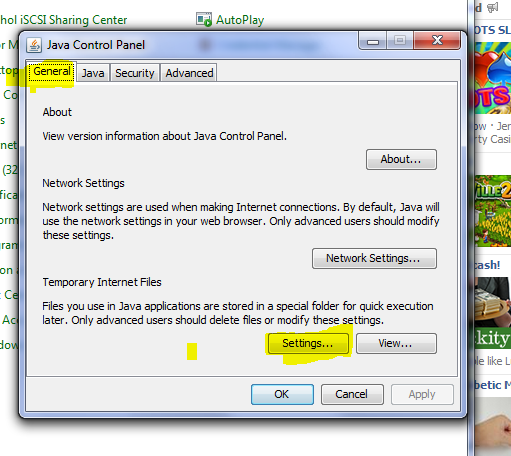
Uninstall Java and Adobe Reader – With Windows doing a better job securing the OS, hackers are seeking softer targets like Java and Adobe Reader, both of which seem to have some type of zero-day exploit a couple times a year. Most of us have these programs just sitting on our system, never being used and never being updated to the latest versions. If you simply must have them, be sure to update them frequently.
Scan Your Ports - The Gibson Research Corporation (GRC) has been providing a free online tool to scan your router for open ports for over ten years. This tool is called Shields Up and you can find it here. The UPnP Exposure test will check to see if your router is open to a new router exploit that gives hackers the ability to access and control your router.

If all is well with the GRC test, you will see the above image.
Run Your Browser In Privacy Mode – Private Browsing (which may be called something else depending on which browser you’re running) allows you to surf without the fear of a history being saved, and temp images, videos, files and cookies being stored on your computer.
In Firefox and IE, this is enabled by hitting CTRL+Shift+P.
In Google Chrome hit CTRL+Shift+N for Incognito mode.
Do The Basic Computer Security Measures – Of course, you should also make sure you are running a current antivirus–if your free antivirus from Symantec or Mcafee has expired, uninstall it and get another. If you do not have one, Microsoft Security Essentials is free. In addition, make sure your WiFi is encrypted in your router settings using WPA-2 so the whole neighborhood isn’t using your bandwidth. Make sure you have Windows automatic updates turned on. Make sure your Windows firewall is also enabled. Modern Windows Operating System will have these on by default, and if you’re running Windows 8 you also already have an antivirus called Windows Defender–built in.
If you have more tips for us paranoid folk, please be sure to leave them below so we can all sleep good at night.

I Spilled Liquid On My Laptop! Now What?

This may be your face when it happens to you. Every day, 1 in 20 Americans spill something on their laptop (Also, 48% of statistics are made up). So something liquid finds its way onto your laptop or smart phone whether by accident or angry significant other and now you must act, or weep in the corner.  With the steps outlined below, you will be able to confidently jump into action and try to keep the damage to a minimum.
I’ve been in the repair industry for about 9 years now and have cleaned the following liquids out of laptops which then went on to live normal computery lives: beer(lager and porters), wine, milk, water, coffee, juice, cat pee (grosses one by far), “mystery white substance”( basically looked like a HAZMAT guy on that job), “mystery smells like human urine substance”(from a frat house), and a couple others I know I’m forgetting.  I haven’t been able to revive every single one of these without a hardware change out, but I have been successful in a good portion of them.  Follow these quick thinking steps below and you will stand a fighting chance!
Water Everywhere!
We are going to show you a quick “not-to-do” section here so you know what to avoid to not put yourself in danger of a possible liquid to laptop unwanted interaction.  See the pics below for a jump start on what not to do…..
Now the above is mostly for comedy’s sake but you can gather some good insight on what to stay away from as well.  Don’t go around swimming pools, lakes, beaches, or Atlantis with your laptop or smart phone. They are not designed to keep out liquids. They do a pretty poor job of keeping out solids for that matter too. There are too many holes and vents all over them to make them proficient at keeping most stuff at bay.
Don’t drink or eat around your laptop.  I already hear the whining and moaning about how you don’t have enough time in your day to do homework and eat or play WOW and function in normal society without having a soda or water right next to you.  Try and schedule yourself a couple minutes away from the laptop to munch down food and drink.  If you HAVE to have food or a drink around, look around and find a good place to set them so if they do get knocked over you wont be making up new curse words because your laptop just became water cooled.
It Happened! What do I do?
That dreadful time has come and your dog has just spilled a gallon of water all over the keyboard of your precious new Alienware RAIDed, super max GPU, RAMy goodness and you think you may be on the verge of a breakdown.  Now is not the time for panic!  **Immediately pull the AC adapter from the laptop and flip it over.  Quickly remove the battery and breathe a sigh of relief.  If you got to these steps without your laptop shutting down or making a popping or zapping sound, you stand a fighting chance.  Go grab a towel or paper towels and set your laptop, keyboard side down, on the drying apparatus.  Let it sit for as long as possible.  There isn’t a good rule of thumb for how long you should leave it sit like this because it could be anything from a drop of water to a 5 gallon bucket full that assaulted your lappy.
Personally, I would leave it for a day with a small fan pointed at it to help the evaporation process.  The next day gently lift it up and see if you notice any still wet areas.  If so, repeat the waiting game.  When it is fully dried out, to the best you can tell, is when you should start crossing your fingers.  Look over the laptop and see if you can see any residue pointing you to where the liquid may have came in contact.  Did it stay on the keyboard?  Did it make it to the touchpad?  Was it fully submerged in the Pacific?  If it only got a little on the keyboard, you may be at looking at worst a new keyboard.(About $25-$60)  If it was a lot, time to take it apart.  If you are not comfortable taking your laptop apart, take it to a professional.  If you plan on that, then you can skip the next paragraph.
Taking apart a laptop can be a challenge but if you are up to it, time to dive in and see where all of the liquid made it.  Heavily inspect the keyboard and touchpad circuit boards and their connectors.  If you see any wetness, dry it off with a non-conductive method such spray air.  Look over the motherboard and see if you notice that it made it that far.  If you see anything like the below picture, clean with alcohol or electronics cleaner and a soft toothbrush or Qtip.
This pic above is from one where the liquid either got to the board before it could be fully powered down or was something like milk/soda/juice/water and started to corrode the contacts.  Be careful when cleaning corroded points like this because if they have been this way long, they can eat at the solder joints making them weak.  If so, then you could dislodge a component and be in even bigger trouble.
After making sure the liquid residue is dried up and cleaned off can we finally see if what we had done above is going to pay off.  Plug in the AC adapter without the battery and try to power it on.  Hopefully it will power on and fully POST and boot.  If so, put the battery back in and try to boot again.  If both went smoothly then it is on to testing out all of the keyboard keys and the touchpad.  If they are sticky or stuck, you can try cleaning them with electronics cleaner.  My favorite is from the Blow Off brand.  If you want to make sure each button is being registered, run over to thiskeyboard testing site and try out each of your buttons.  If they both work, try your wifi, camera, and any other devices your laptop has to make sure everything made it out unscathed.  Hopefully by your quick actions you have saved your laptop and don’t have to replace any parts!
Conclusion
What have we learned from all of this?  First and foremost, don’t try and put yourself in the situation to possibly contaminate your laptop with a foreign substance.  Don’t eat or drink by it if possible.  Stay away from the beach or swimming areas and leaky toddlers as well.  If it happens, DON’T PANIC.  You now are equipped to minimize the damage done with these steps and quick thinking and acting.  The steps you take immediately after it happens could determine the fate of your laptop!

Tuesday, April 23, 2013

How to Safeguard Your Windows Computer from a Browser Hijack

browserhijack-iconA browser hijacking is the practice of taking advantage of vulnerabilities in the browser (or the user) to compromise the user’s computer in a manner that would serve the interests of the hijacker. Often, a browser hijack can make your browser start up on a page other than the homepage you have designated. Sometimes it silently watches you while you work and steals passwords or other data. There are a few ways a hijacker can actually compromise your browser, and we will detail each of them as well as discuss how to prevent them from happening.

Note: This article is specifically targeted at Windows computer, but the security issues could happen to any OS as well.

1. Vulnerabilities in Plugins

browserhijack-manipulation
Your browser, even “out of the box,” uses a number of plugins to add extra rendering capabilities on websites you visit. In Firefox, you can view these plugins in the Tools -> Add-ons -> Plugins” section. These plugins are generally fine, but some of them are poorly coded and open holes in your browser’s security that it has not anticipated. The Java plugin is a perfect example of a vulnerable module. Java’s interpreter itself is prone to very nasty vulnerabilities that allow hackers to infiltrate your computer and post updates on social media sites on your behalf.

How to protect yourself:

There are two things you can do: keep all your plugins up to date and delete any plugins you don’t absolutely need. I need not mention how difficult it is to keep 100 plugins up to date. It’s better to look after five or ten of them. This applies to the addons and extensions as well. (Note that in Firefox, plugins and addons are not referring to the same thing)

2. Being conned to download unwanted software

browserhijack-trap
If you have been to some sketchy download site, you would have seen cases where it try to convince you to download (and install) a software before you can download their stuff. They put fake download buttons on their pages leading to other sites that offer a “downloader application” to get your file. They convince you that you need this application in order to gain access. Once you run it, you are met with an unpleasant surprise. Sometimes the application doesn’t work at all but installs a virus in your computer. Other times it works, but installs a service that spies on your personal information.

How to protect yourself:

Look carefully at sites showing you more than one button for the same action. Be mindful of what you see on the Web and exercise scrutiny. If the website doesn’t have a strong positive reputation, don’t trust it. Search the website’s URL surrounded by quotation marks on Google. See what other people say about it.
And if you have downloaded the software, run a anti-virus/anti-malware test before you install it. If you do decide to install it even though you are not very sure about it, do a backup of your system first.

3. Toolbars

browserhijack-toolbar
When you install software, it sometimes sneaks into a dialog where it asks you if you want to install a toolbar (and that’s when it’s playing nice). This is the most common way in which people are duped into installing browser toolbars that mess with their computers. This kind of software relies on a psychological flaw, namely the fact that people have a general tendency to click “Yes” and “Next” and skip over installation steps in their impatience. It happens even to the best of us.
Toolbars are sometimes inoffensive, but many times, they can be just as bad as viruses. Some of them set your homepage and search provider as they see fit while not letting you disable this or uninstall them. Others grab your keyboard input and steal your passwords and other confidential information. Since you use your browser to log in to web-based services and authenticate your card data, it’s very obvious that a toolbar like this can be extremely dangerous to your privacy. Although such malware is not very common nowadays, it still poses a significant threat to users who are easily absent-minded during software installations.

How to protect yourself:

These toolbars tend to be very difficult to get rid of, so the best way is to observe your installations carefully everytime you run an installer.. If you’re installing a program and it asks you to install a toolbar, refuse wherever possible. If it’s not possible to refuse, do not install the application. There are always alternatives out there that are more worth your time. Remember always to keep your anti-virus up to date. Most antivirus software can efficiently detect malware that’s found in toolbars and get rid of it, even if you can’t. Don’t forget to try to stick to sites that are reputable rather than Internet back-alleys to download your stuff.

4. Native Browser Vulnerabilities

browserhijack-vulnerabilities
There are plenty of browsers out there and some of them come with unintended security vulnerabilities. If you (or your company) are still stubbornly using IE 6 and 7, or even 8, as your primary browser, you are basically inviting the hackers to attack you. Even a popular browser like Chrome also has security issues, namelycross-site scripting (XSS), that make it vulnerable to attack.

How to protect yourself: 

There is nothing much you can do except to wait for the browser’s developer to patch up the security loophole. Thus, you should always upgrade your browser to the latest version so new fixes to vulnerabilities will automatically be installed. In addition, make sure you exercise care and vigilance when browsing the web, even with the most secure and most updated software.

Questions?

If you have any questions, do not hesitate to leave a comment below! Also, don’t forget to let other readers know what useful tips you have to keep your browser safe!

Tuesday, April 16, 2013

Computer Troubleshooting Guide

This computer troubleshooting guide can help you troubleshoot and repair dead computers. When we mean “dead” we mean no signs of life at all. Where do you even begin? The average user doesn’t know the internal workings of their computer–and they shouldn’t have to. So when things go wrong, they do not know where to begin to diagnose and either fix the problem or make arrangements to have the problem corrected. The following steps will help give you some general knowledge of what could be wrong with your PC and give you some ideas on how to fix it or provide you with enough knowledge to prevent you getting ripped off at the computer repair shop.
For starters, if the computer is still under warranty, do not open the case, as this will void your warranty. HP, Dell and any other major manufacturer will respond quickly to your problems and arrange for you to send the computer in, or they might opt to send a technician out to work on the computer. If you bought the PC at a shop around the corner, send emails and begin a paper trail on the issue.
With that said, a completely dead computer will usually have either a bad motherboard, bad power supply, or a faulty case. The following steps will help you troubleshoot a computer and find which device is causing the problem. Well start with the easiest and work our way down to the hardest. One of the first things you’ll want to do is unplug the computer and take it to a table where you can lay it flat. Open the case and check the connections to see if you notice anything blatantly wrong, then proceed with the steps below.

Troubleshooting A Computer Power Supply

Power supplies can fail without warning. The worse part is, they can partially fail. This means you might be getting power to the motherboard, the fans and other components, but you do not have the correct voltages to start the motherboard.The power supply is located at the back of the case, and is where the power cable plugs into the PC.
  1. Your first step should be to plug the computer directly into the wall and bypass any power strips. You should also confirm the outlet is working properly.
  2. Make sure the red voltage regulator switch on the back is set to 115 if you reside in the United States, people in some countries will need to set theirs to 230. With the power off and unplugged, try toggling the switch to 230, then back to 115 to make sure it is seated in the right position.
  3. Next, buy a power supply tester. Computer techs will use a multimeter to test for proper voltages. Normal users can just buy a power supply tester. These are cheap and easy to use.
  4. If your power supply is bad, buy one of equal or greater power. If your current power supply is 350WT, be sure to get one that’s 350WT or higher. Shop for apower supplyTroubleshooting A Computer.
  5. If you have an HP computer, read these HP power Supply troubleshooting tips.
Troubleshooting A Computer
A power supply will tend to fail before anything else, as they take the most abuse. They are the front line when a power surge or brown out occurs. The good news is, they are extremely easy to replace should you find this is the problem.

Troubleshooting A Computer Case

While a dead PC will either normally be a bad power supply or bad motherboard, the next easiest thing to troubleshoot is the case. How can a case go bad? A case has minimal smarts, but it does have wires leading from the power button to the motherboard that can go bad, and some even have advanced I/O panels that can fail.
  1. You can try bypassing the case switch. This means you are initiating the power-on sequence without using the button on the front of the case. For this, you will need a good set of eyes and a small, flat-head screw driver. The idea is to find the wire leading from the power button to the motherboard that’s marked something like POWER SW or POWER ON. It will cover two pins on the motherboard. Carefully, with the computer plugged in, touch tip of the flat head screwdriver to both of those pins at the same time, thus “shorting” them. You will not get shocked by doing this, but you need to be careful not to scratch the motherboard. Read more on bypassing the case switch here.
  2. If you have a Dell computer, read how to test a Dell I/O panel here.

Troubleshooting A Computer Motherboard

The motherboard is the hardest thing to diagnose and replace. If your motherboard is proven to be bad, it must be removed from the case and replaced. Unfortunately, there’s a lot of stuff plugged into the motherboard, such as the CPU, RAM, PCI cards, Video Cards, hard drives, CD / DVD drives, power supply and fans. There are also tricky connections that must be made to the case’s power and reset switches. So replacing a bad motherboard is a long process. A bad motherboard will be determined by the following:
  1. If all of the above are not the problem, the motherboard is the problem by default.
  2. A bad motherboard might have visual signs of damage, such as bulging or leaking capacitors. See below.
  3. With the computer unplugged, try holding in on the power button for twenty seconds. This will drain the capacitors of any excess power. The computer might start up and work fine forever. If the computer starts, then fails again after doing this, then the motherboard is bad.
  4. Try removing any non-essential cards and drives in the computer. You do not need modems, sound cards, hard drives, CD / DVD drives, or floppy drives connected to boot. Our goal is to get a clean power-up situation, not boot into windows. If you remove non-essential parts and you still have no power, then the motherboard is bad.
computer troubleshooting tips

Thursday, April 11, 2013

Room to operate

      In simple terms, your PC needs room to operate efficiently. Ideally half of your hard drive should be the data mark. However up to two thirds is acceptable.
      I have exceeded that amount so I have to go through and discard unneeded files, along with duplicate files. Real easy to get several copies of the same pictures under different names. As far as I know there isn't a program free or otherwise that will do it with any real accuracy.
     If you know of one, please leave the name of it in the comments area.


Wednesday, March 20, 2013

facebook privacy

3 Ways to Control Who Sees Your Facebook Posts


It’s the moment every Facebook user dreads: Getting a friend request from your boss or a client or your mother-in-law. You can’t deny the request, because … well, it’s your boss or client or mother-in-law. But at the same time, you don’t want someone who can get you in trouble at work or on the home front looking through your party photos or updates.
All is not lost, however! Just because you use Facebook doesn't mean you need to surrender your privacy – the social networking site gives you all the tools you need to keep prying eyes out. With just a few simple clicks, you can keep snoops out of any or all posts you make without going through the social hassle of denying a friend request (or worse yet, later unfriending).

Block access

Facebook privacy settings
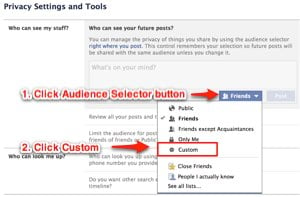
The easiest way to deal with a snoop is to limit their access to your profile, posts, and albums. Doing so takes only a minute.
First, click the cogwheel in the top right hand corner of the page. Choose “Privacy Settings” in the menu that opens up. This opens up a new page where you can manage who sees your past posts and who can see your future ones. Find the section that says “Who can see your future posts?” and click the “edit” link.
From here, you can click the audience selector button and then “custom” from the menu that appears. This brings up a new box where you can use the “Don’t share this with” option to keep your boss in the dark for as long as you want. Just type their name into the box. Click the “save changes” button when you’re done, and this setting will become your new default for all future posts.

Hiding an individual post

Facebook per post blocking
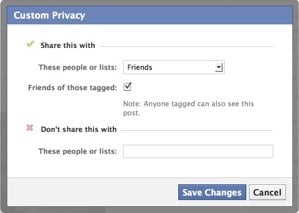
Okay, so maybe the person isn’t nosy enough that you need to block access completely – you’d just prefer him or her to not see one specific post about playing hooky, for instance. No problem. Just click the button immediately to the left of the blue “Post” button when typing a status update. Just like using the Privacy Settings page, you can choose to block individual people from seeing the post using the “custom” option. Think of it as giving your boss a brief social timeout.

Limiting access to types of posts

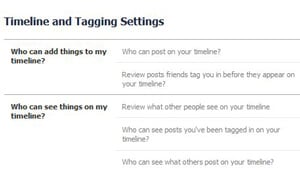
Sometimes it's not your posts that are the problem, it's what your friends are posting. To limit the person's access to what others post on your timeline, got to the Privacy Settings page and select Timeline and Tagging. There you can choose "Who can see what others post on your timeline." You can also limit "Who can see posts you've been tagged in on your timeline."
Any one of these methods can help you control what any Facebook friend can see or not see. Know that you can always undo any of these blocks at any time as well. And remember, when in doubt about posting something sensitive on Facebook, the best policy is not to do so.

Monday, March 18, 2013

Is your Face-Book/Pogo running slow?

  Here's how to fix that.

First You want to clear the java cache on your computer. This is in your control panel. If you don't see the java in the control panel, you need to download from  http://www.java.com/en/ . make sure it is the one for your system, 32 bit or 64 bit, and for your browser, IE: Firefox, internet explorer, chrome. etc.


Select the control panel from your start menu. This is what mine looks like in Win 7


Next you will right click on java and from that menu, select open. It will give you this pop up.


Click on settings. This will give you the following menu.

you can either select how much to store on your PC or you can choose not to store any temp files by unmarking the "keep temporary files on my computer".


With that done, we will proceed to the browser cache. Different browsers do it different ways. I will show you  Firefox, chrome and IE.

I'll start with Firefox.


click the arrow on the top left. It will open the following menu.

You will want to go to the add-ons and under that, the options. A smaller menu will open to the right, again choose options and you will get the following pop-up window.


First use the advance tab on the top(#1), then the network tab under that (#2). once there you should see the above menu. you want to clear now (#3) and finally ok to close it out (#4).

If you use chrome this is how to clear your cache.


Click on the "menu" icon on the upper right (#1). Go down to tools and click that(#2). and on the new menu to the right, click clear browsing data (#3). It will open a new window tab.


and automatically open a separate cache window.  This is what I recommend to clear out. Unless you
want to redo stored passwords, look for your favorite sites all over again, etc. Click clear browsing data. When it's done it will close out and leave you with your settings page. Unless you are having other settings problems close the tab out . All done.page.


IE is next.
Upper right, click on tools (#1) and go down to internet options(#2), then click.


You will get a pop-up window. Choose the delete option in the browsing history.


You will get another pop-up window like below. Look closely at what you want to clear. Be careful of which items are to be cleared. Otherwise you might have to look for favorites etc all over again.


Hope this has been of some help.

The requests in FaceBook apps need to be cleared out fairly often. Even though I answer all of my requests, they do not clear in here. I let it go for 2 weeks and had well over 1500 requests not cleared off this list.


Go to your requests.


note there are over 100 in mine. and you may also show other apps requests in here, you want to clear them too.


Ignore all. This does NOT delete them, it just clears them from your messages, there by freeing memory for the game. click the requests again and repeat until they are all gone.


Now you should be able to play. (At least that's what playdom says.)